My First 'Working' Project, a HOTAS Throttle Prototype
My lessons learned, both planning and technical, from my first working prototype of my HOTAS throttle
Published on January 19, 2022 by Adam Krpan
prototype hotas/hotam throttle star citizen
13 min READ
What To Expect
Project: Rough prototype of a flight/space simulator throttle
Components: Hall effect sensors, bearings, Arduino Micro
Themes: Completing projects, motivation
Lots of Parts, Nothing to Show
I’ve always had a hard time finishing projects. I don’t think it’s because I’m not capable, I just always get absorbed in the process, all the cool little bits and mechanisms that make them up. Six months after moving into a house, I went and threw away a bunch of old prints that helped me learn or test a tiny bit of something, but you know how many actual finished projects I have from that? More or less zero, and no matter how many excuses I make, I know it’s because I spend too much time making little test bits because it’s the “fun” part to me. To quote the lovely maker Zack Freedman, “Tinkering is never worth it because there is no ‘it’. You just can’t finish a project until you define what ‘finishing’ is”. What I really need to do is finish some projects and let the learning happen on the way as I go. Let’s change that!
The first and most important part of this is that I have to really want the project I’m working on. How I think of it, this motivation can come from two places: necessity, when there’s some problem or task at hand that I’m accountable to complete and/or my life will generally suck without, and desire, having some fantasy to live out or just wanting to see something exist that didn’t exist before.
For me, this inspiration came from my recent descent into space sim games, first Elite: Dangerous and then Star Citizen. From middle school I’ve always had daydreams of epic fighter jet dogfights, and since I finally started taking on bounty hunting missions I’ve been realizing how cool that fantasy can feel. However, you can only go so far with a mouse and keyboard on this. Pressing “W” just isn’t the same as slamming a throttle forward, and an epic dodge or intense dogfight just doesn’t feel right sliding a mouse around.
This desire then turned into a sort of necessity (for the game at least) when I started trying to pick up mining in Star Citizen. I picked up a Greycat ROC (a ground mining vehicle) and discovered the painful truth that with a keyboard the throttle is either all on or all off, so driving is a jerky mess. I really love the general mining gameplay, so having something to make it just a little easier to drive would go a long way.
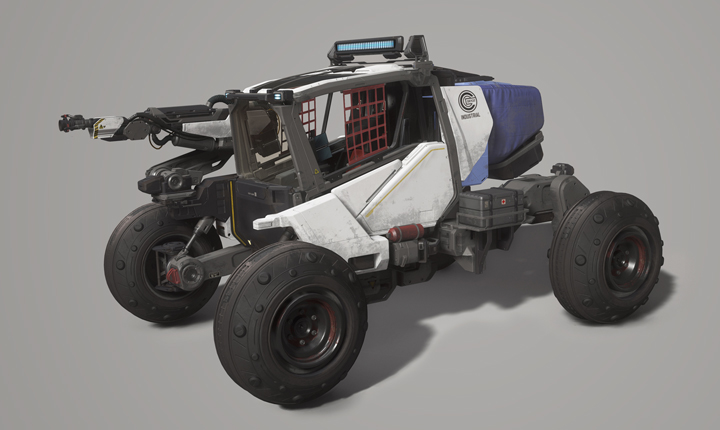
The Greycat ROC from Star Citizen, the vehicle that really kicked this off
I think eventually I want a “HOSAS” (“Hand on Stick and Stick”, so two joysticks) setup, but a “HOTAS” (“Hand on Throttle and Stick”) is probably more realistic for now and “HOTAM” (“Hand on Throttle and Mouse”) is also a viable strategy to start with. Because of this, and because it’s the simpler component, I’ll be starting with a throttle first.
Planning and (Useful) Tinkering
When it comes to throttle designs there’s a wide variety it seems, both for real aircraft throttles and replica or simulator throttles. I’ve never had the luxury of using either, so I’m going pretty much entirely off of pictures, video, and my own fantasies. This gave me two interesting problems to sink my teeth into: how the handle is mounted and moves, and how to read the current value of it. All of this thinking was actually going on before we moved, so there was a pretty long gap between this original prototyping phase and the actual build described later.
For how the handle moves I could think of three primary concepts, which I’ll call “angular”, “linear”, and “railed”. “Angular” is something like the Thrustmaster Warthog throttle, where the handle pivots on a central axis in the base. “Linear” is something more like the Thrustmaster T.16000M where it slides straight along an axis. “Railed” I haven’t seen an existing product do, but it’s intended to emulate the profile of something like the 737 throttle (a very shallow curve) without requiring a super bulky base to get the axis all the way down.
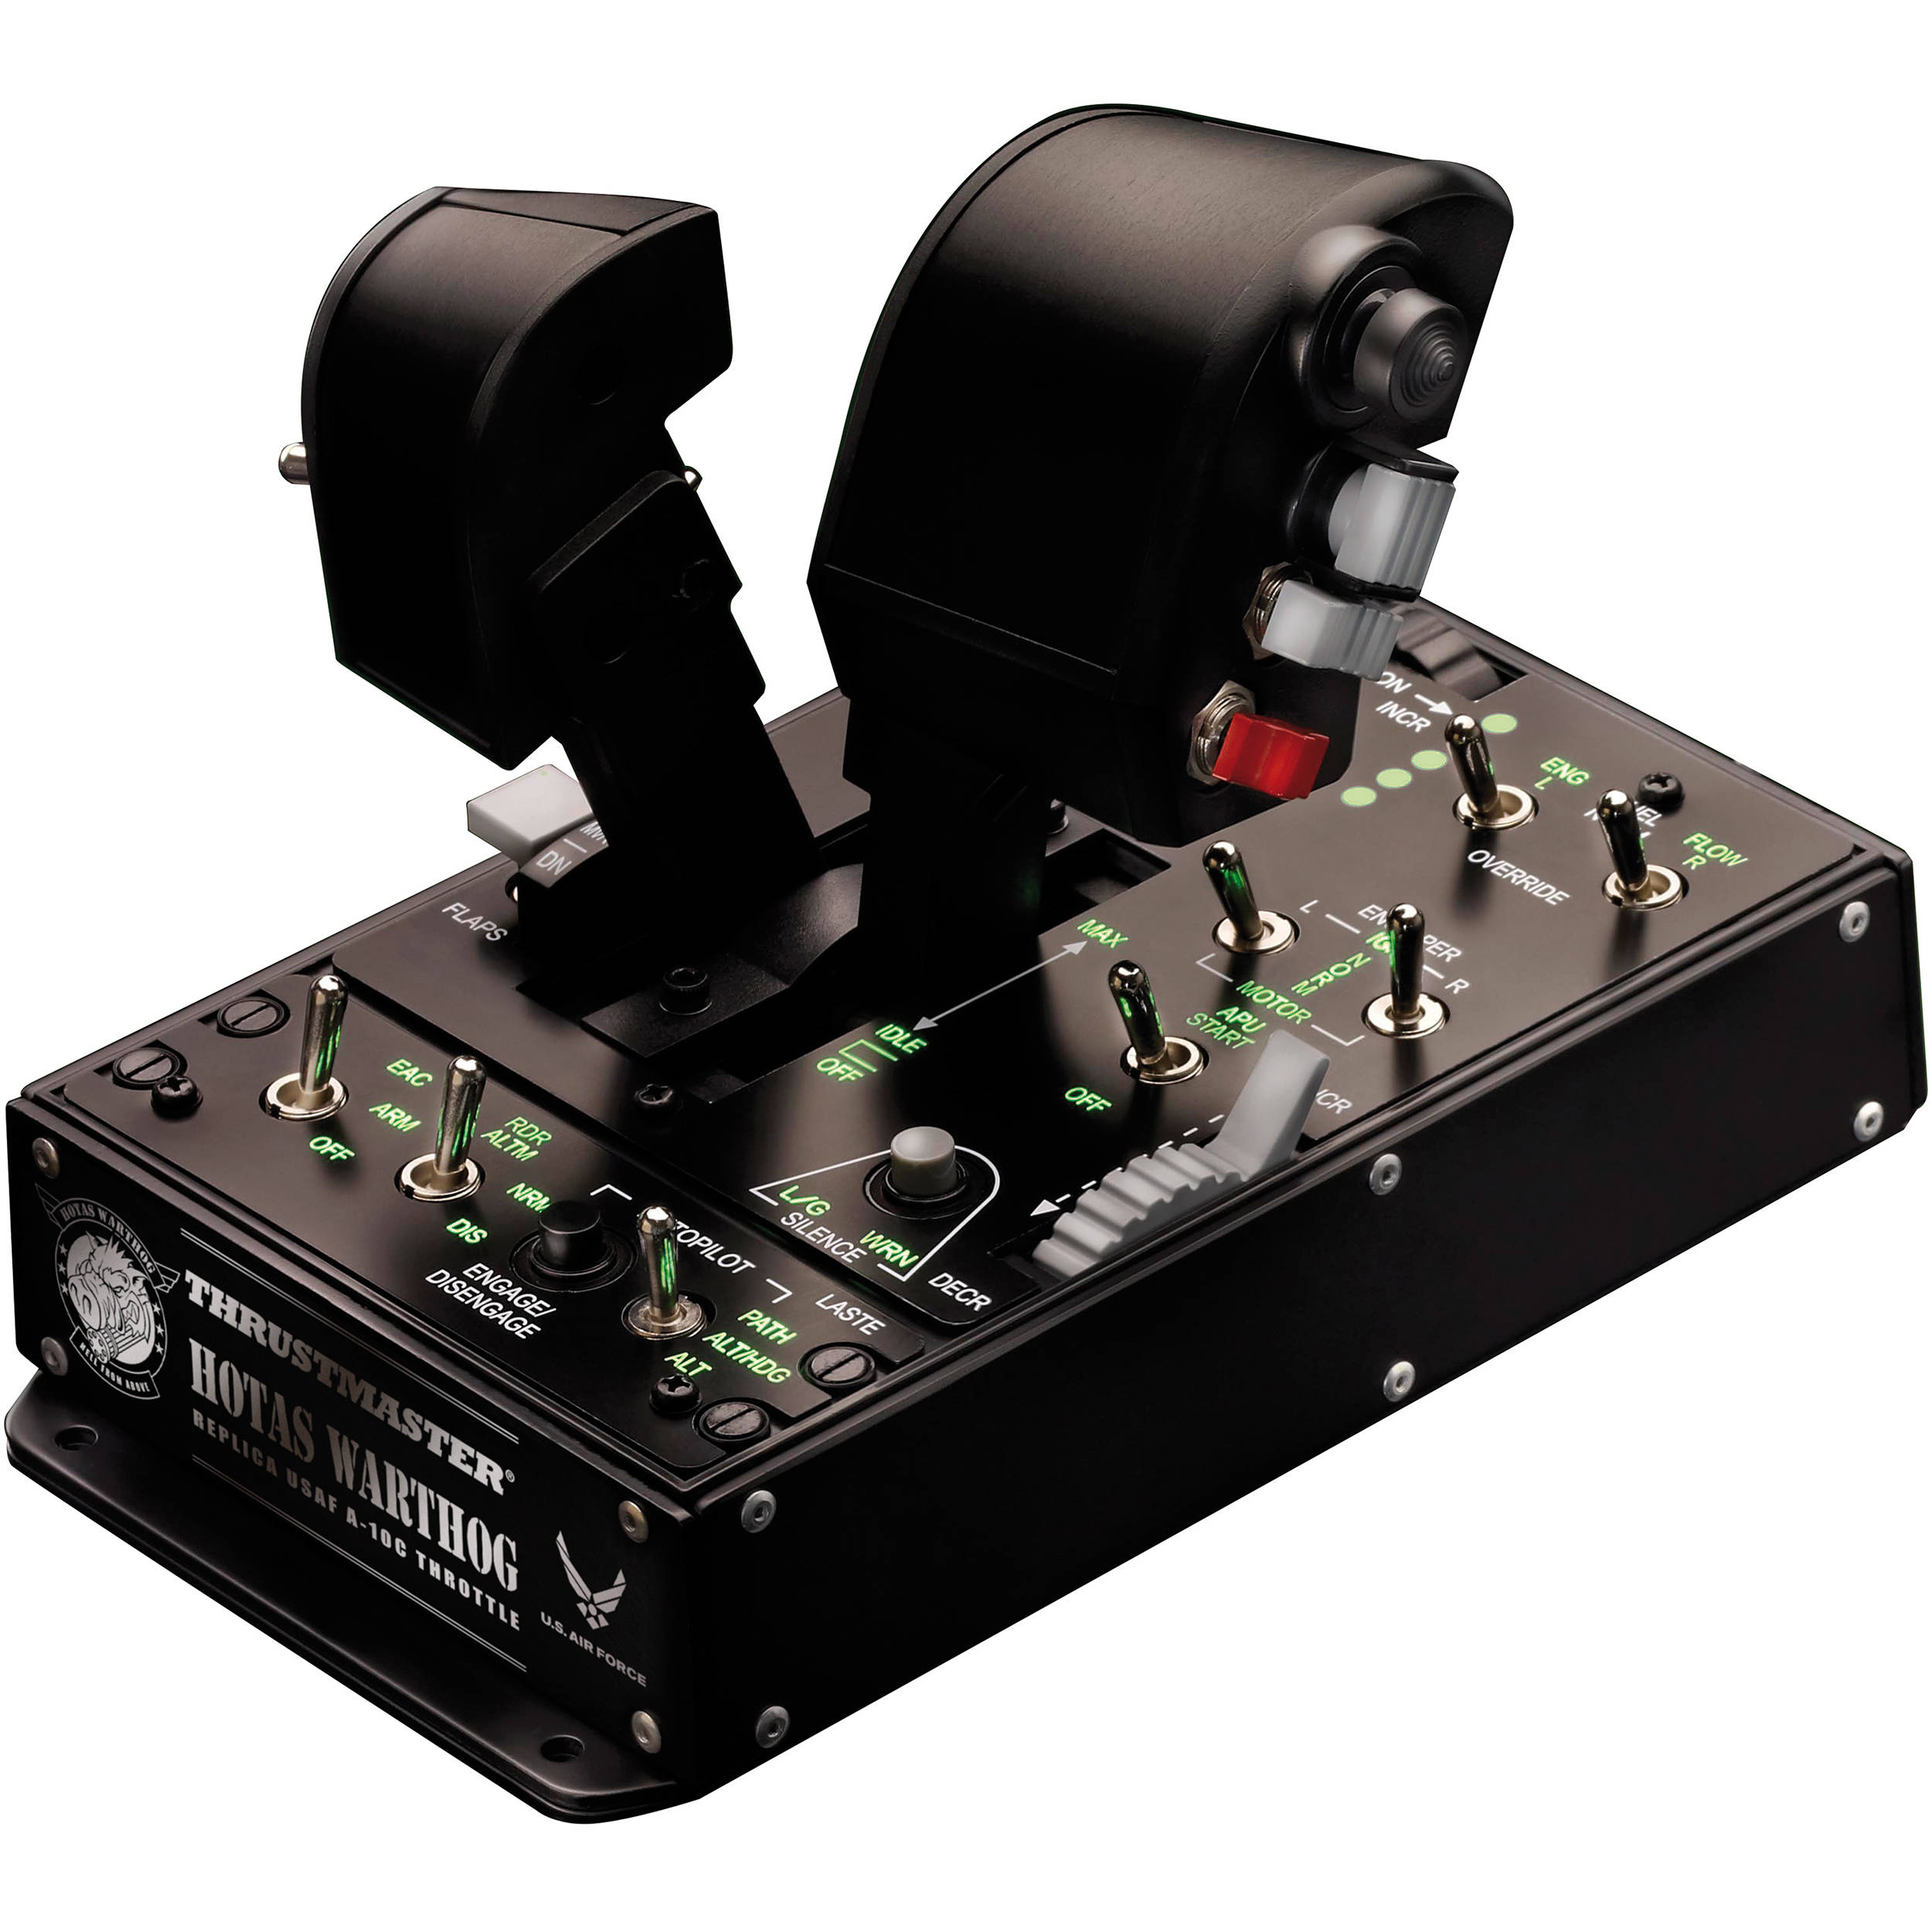
Thrustmaster Warthog throttle, the "angular" or "rotary" concept
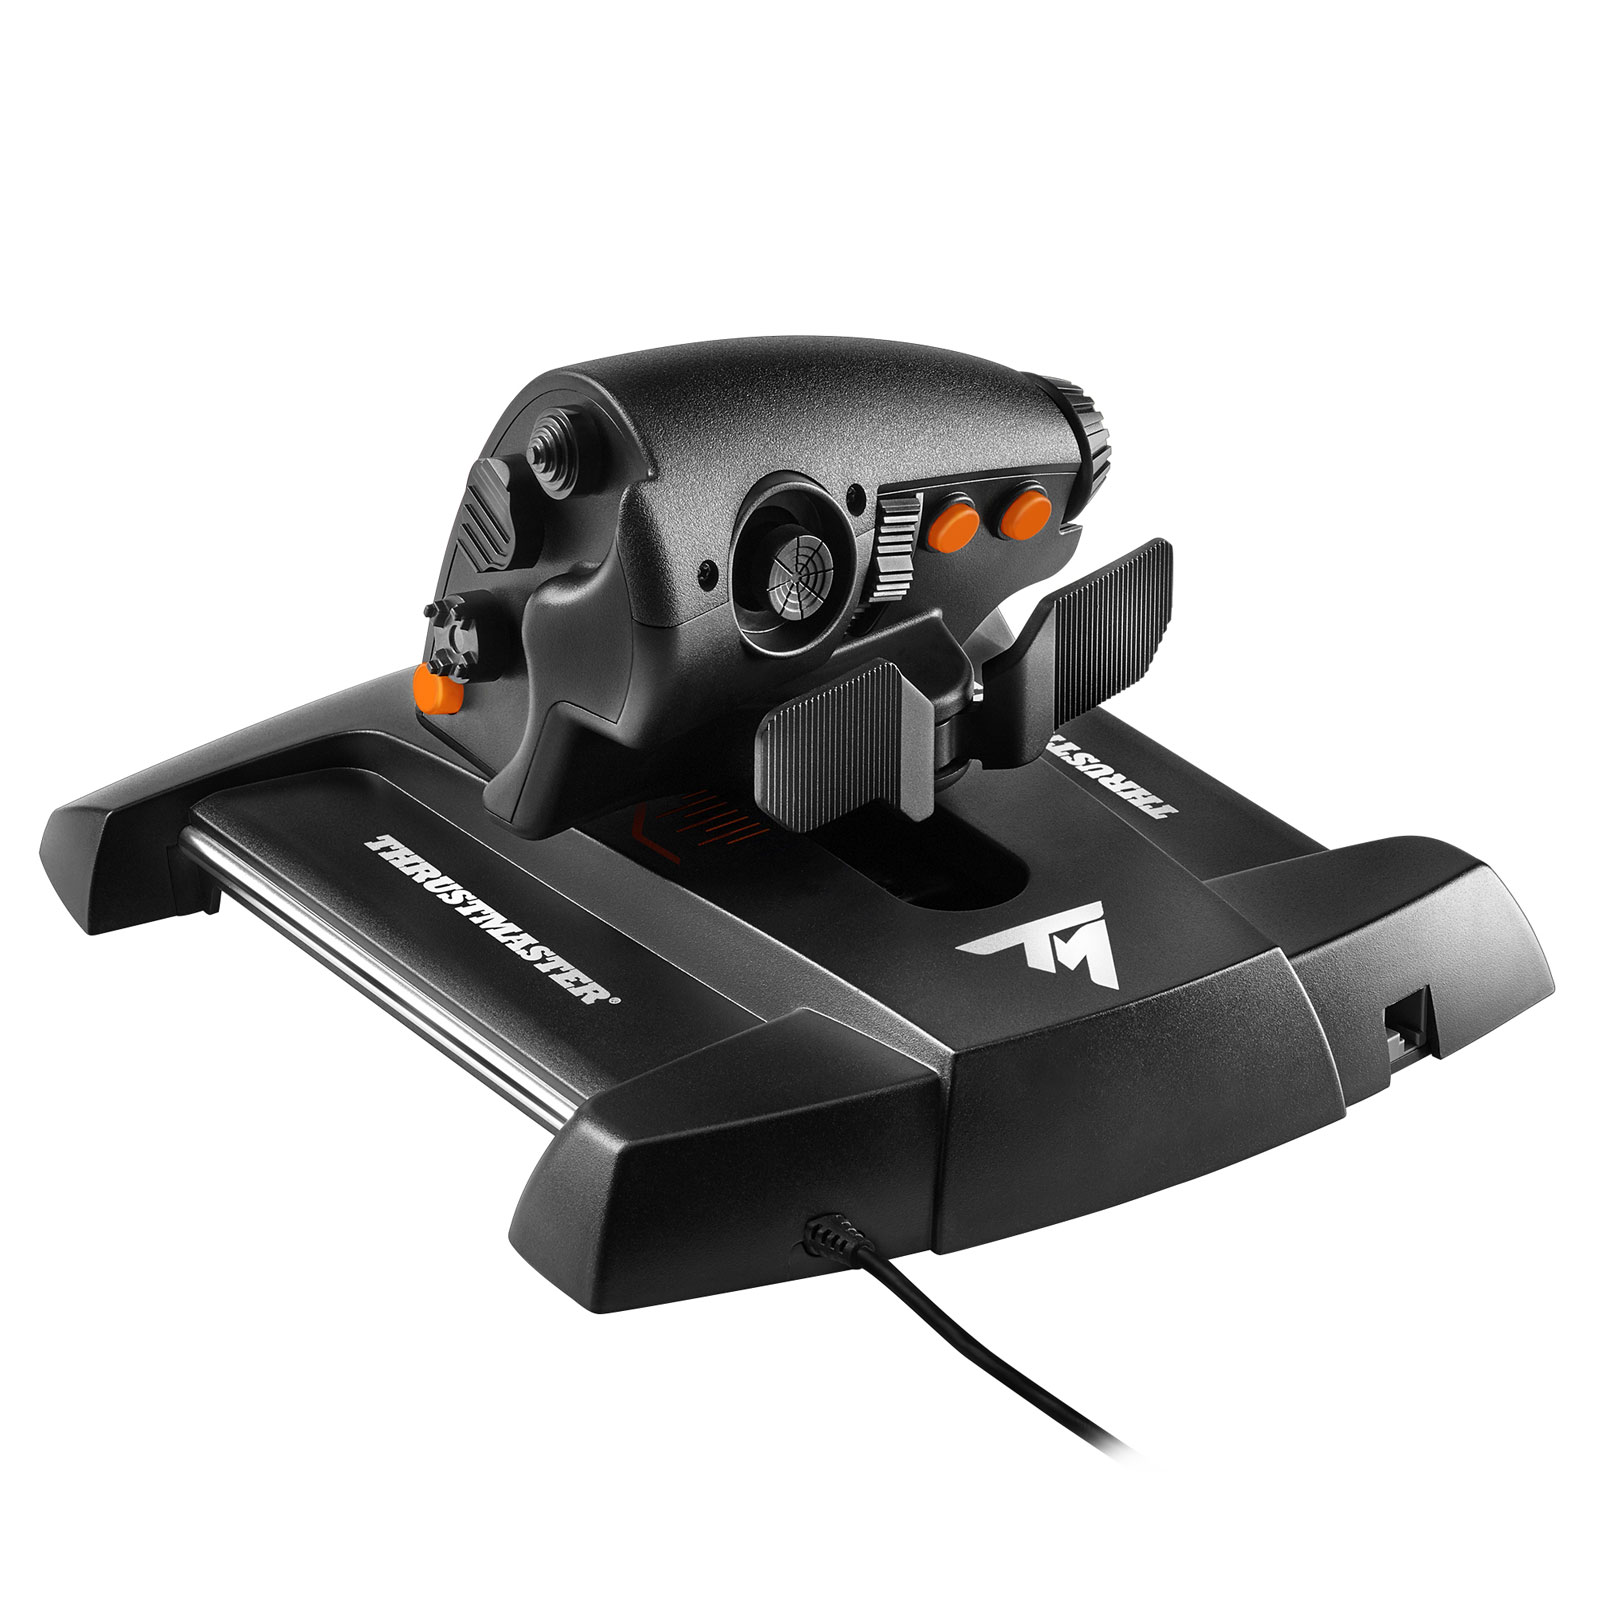
Thrustmaster T.16000M, the "linear" concept
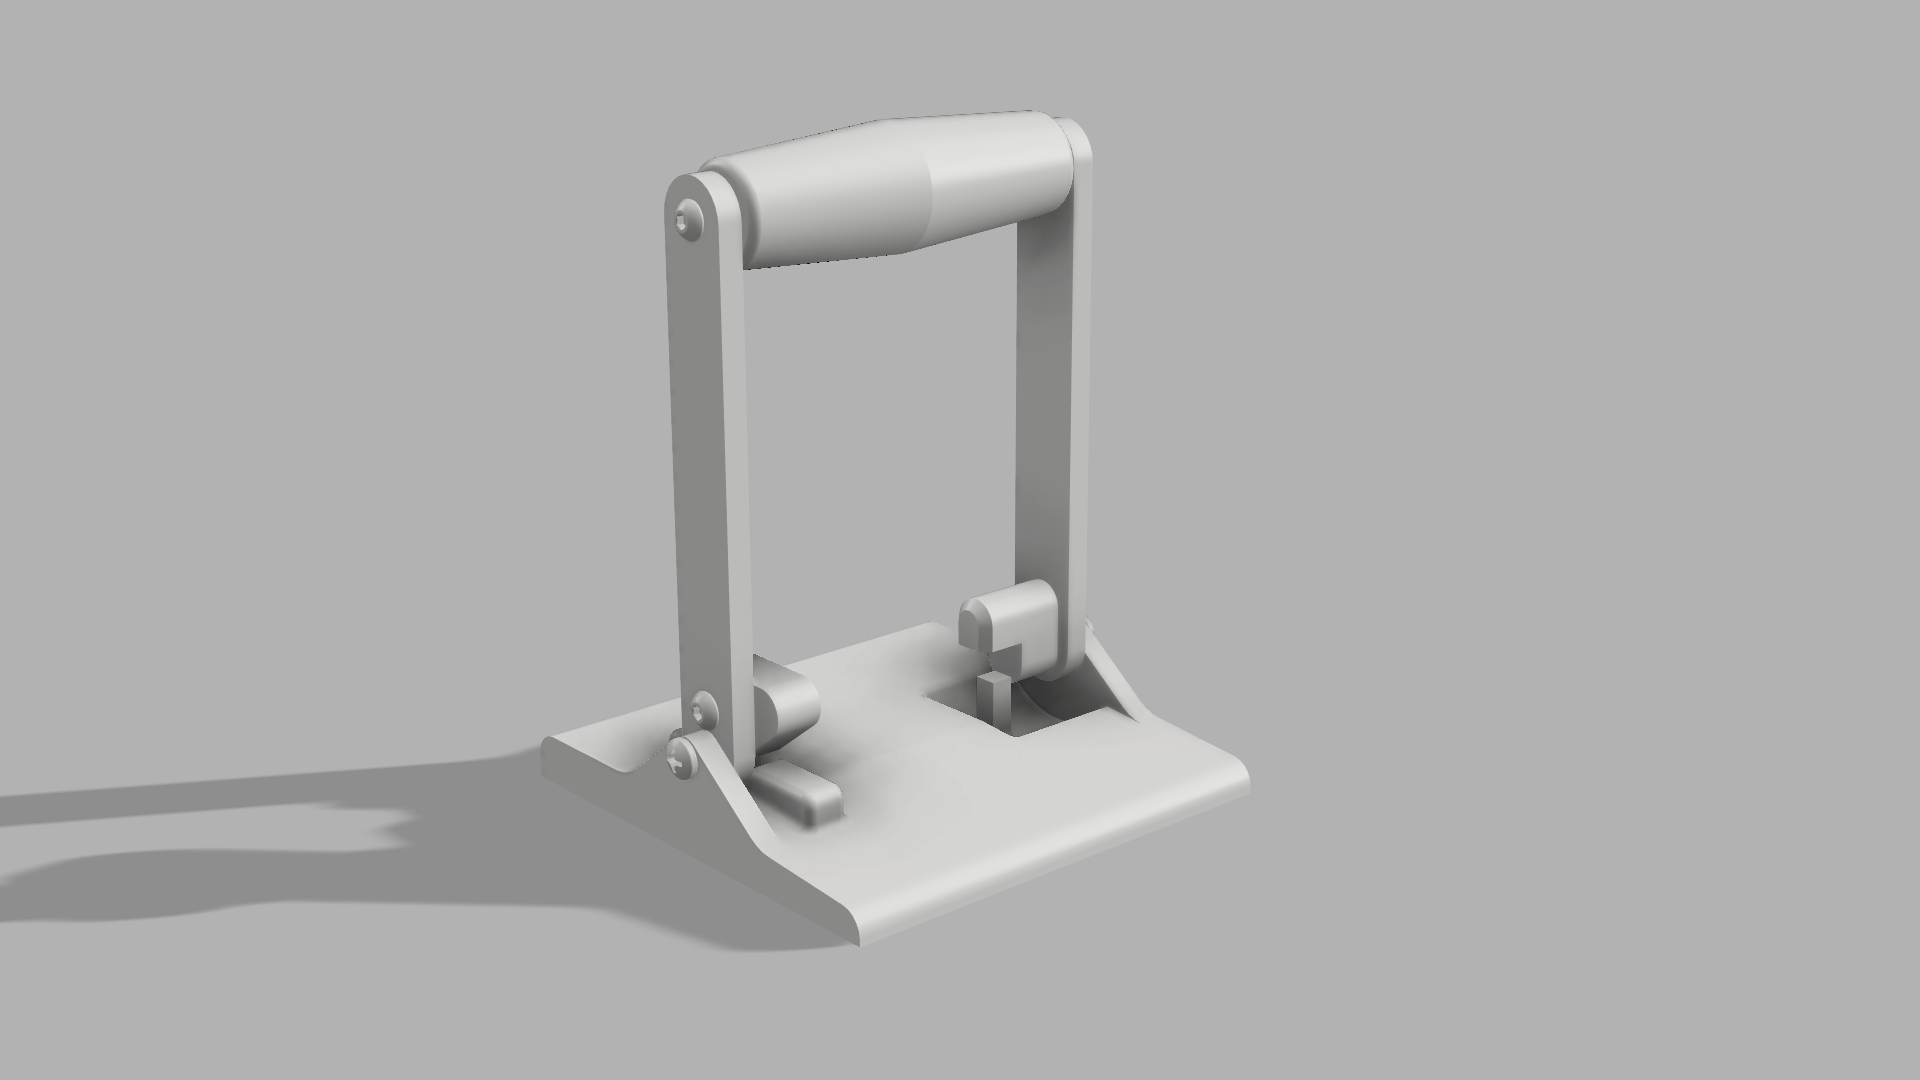
Angular Throttle
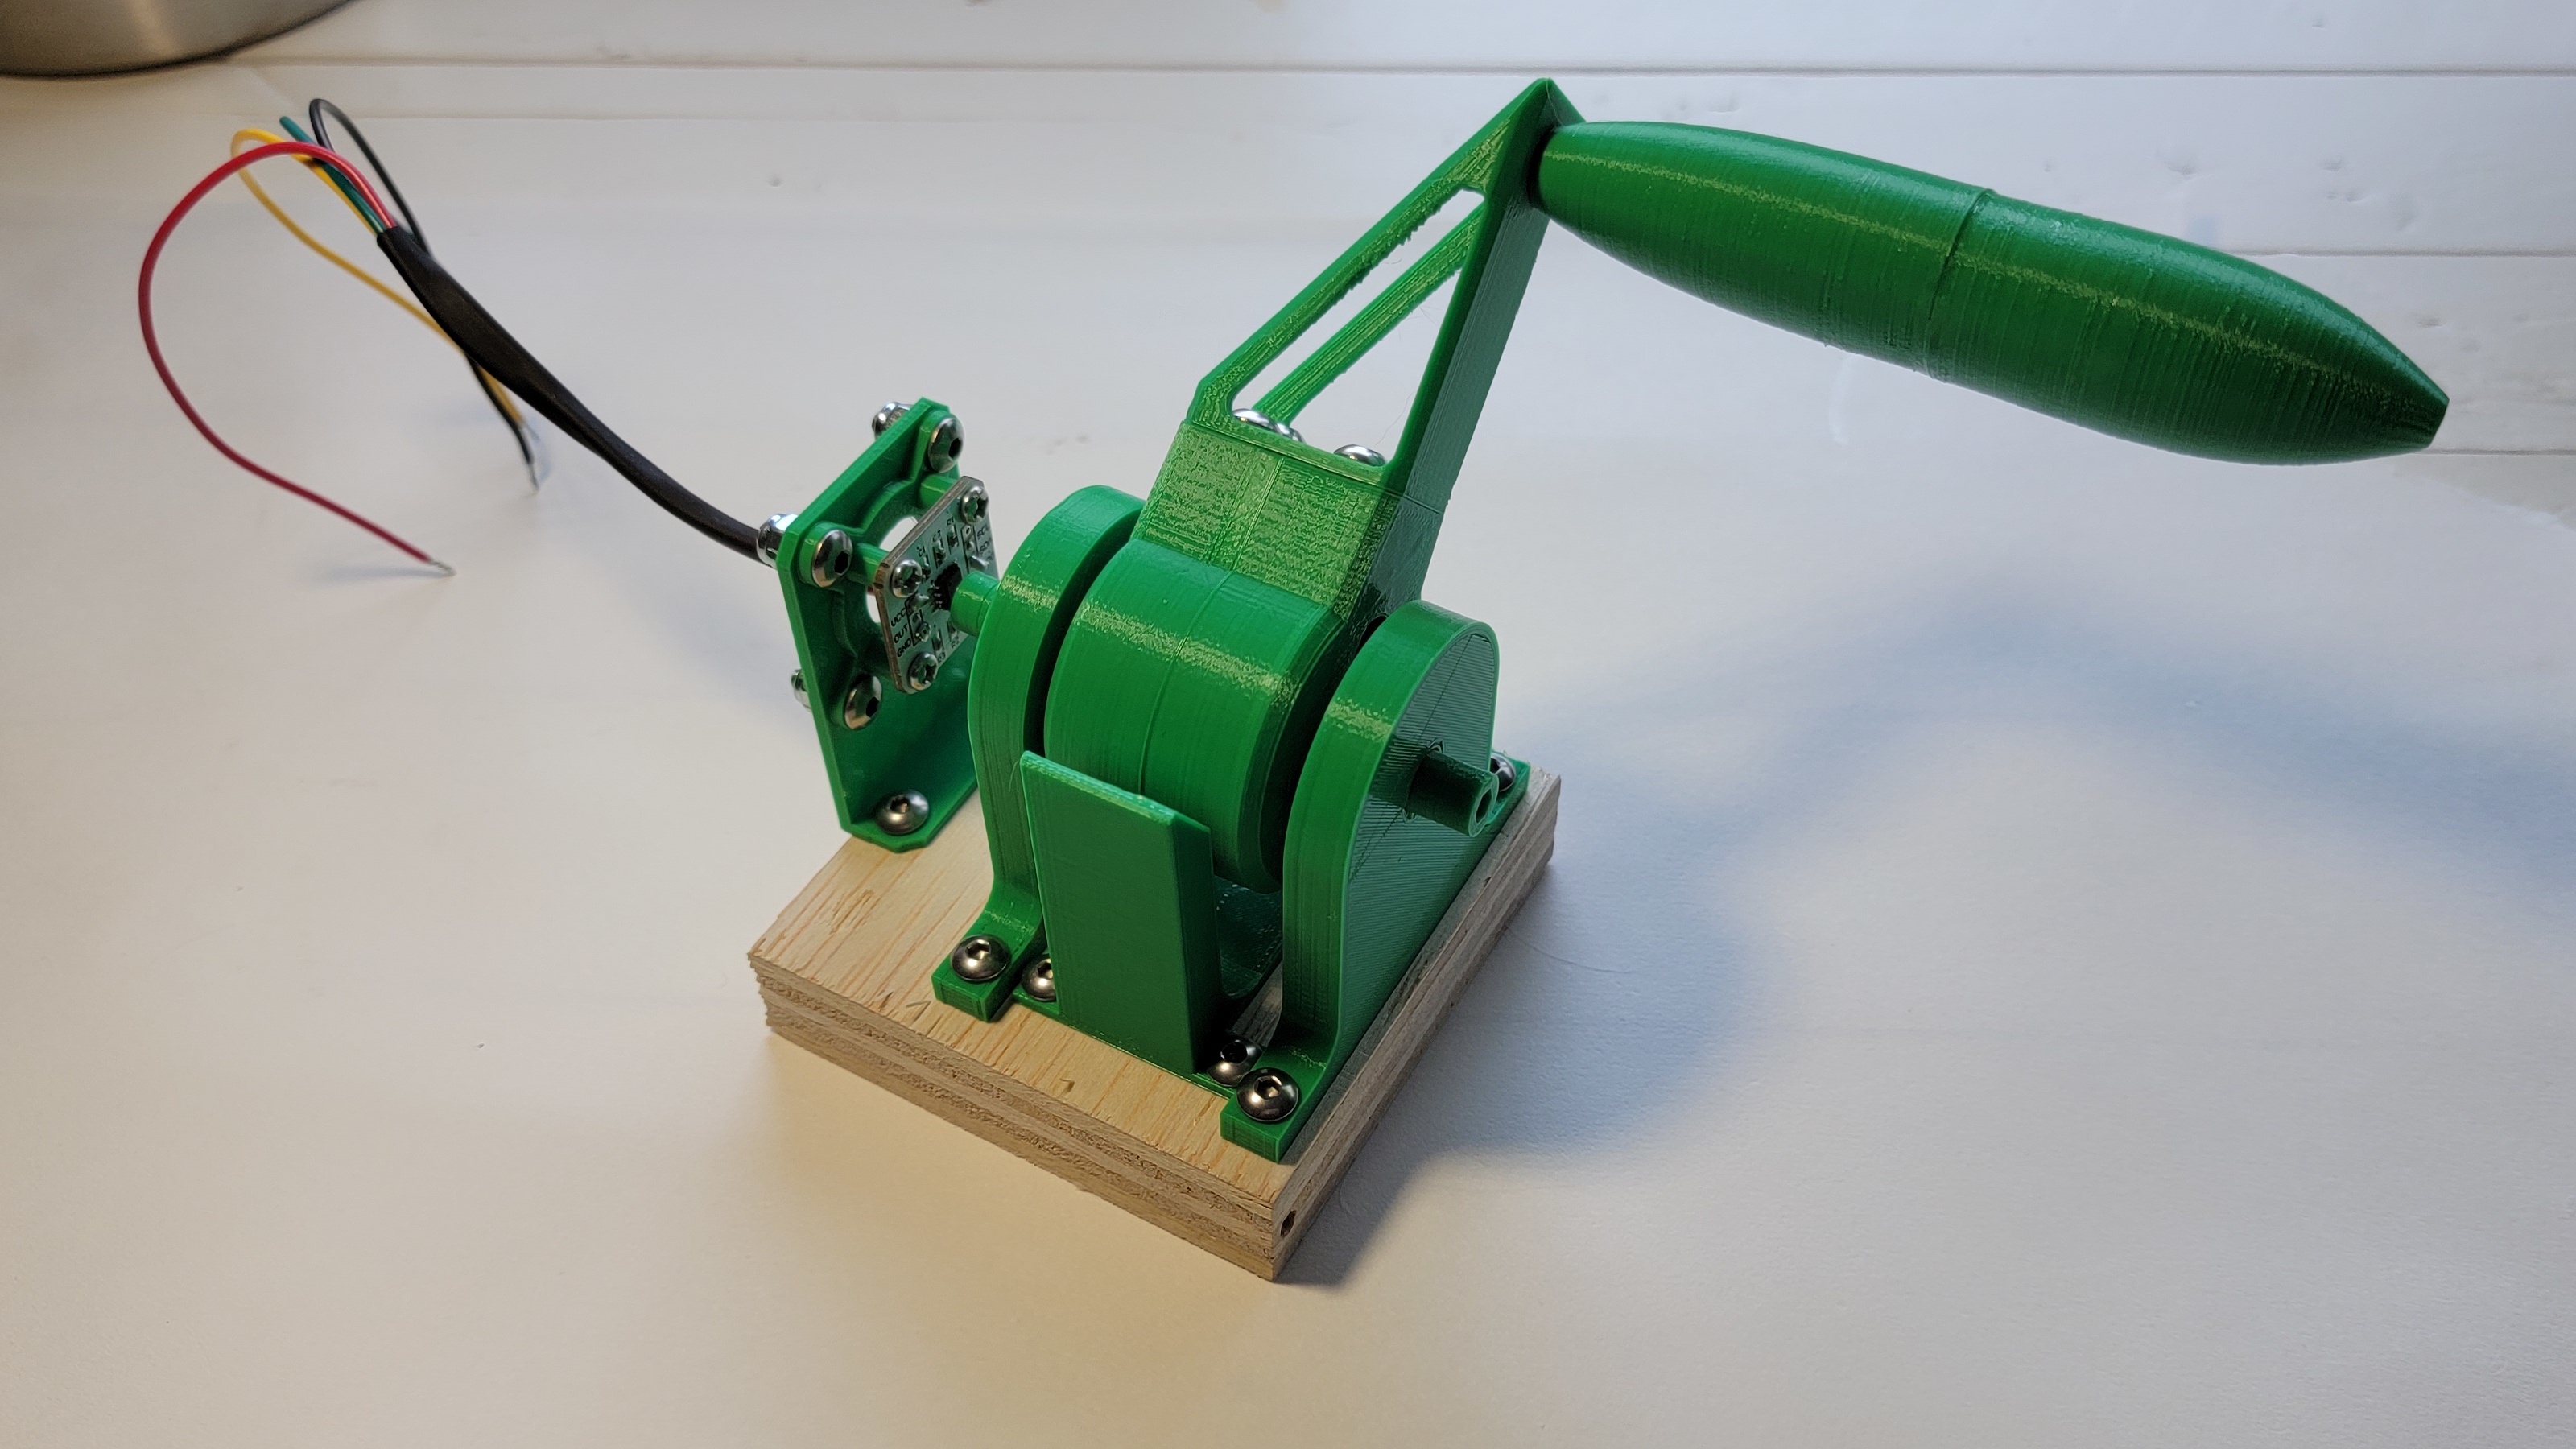
I used the prototype of the angular throttle to start getting familiar with another mechanism, hall effect sensors. It seems like most joystick projects I’ve seen use hall effect sensors, and potentiometers have just never worked great for me, so I valued the opportunity to try an alternative. For this prototype I just used a raw sensor with leads, so it was hot glued on to the little post in the model and the magnet rotated around it to change the direction of the magnetic field. This model was enough to prove that the throttle idea and sensor would work and that’s all I really cared about, so I didn’t use it for much other than gawking at the graph on the screen and flailing back and forth. While it’s not a “mistake” I made, I really could and should have stopped here to flesh this out into a full functioning prototype, in the spirit of “getting something working first, then improving it”.
Linear Throttle
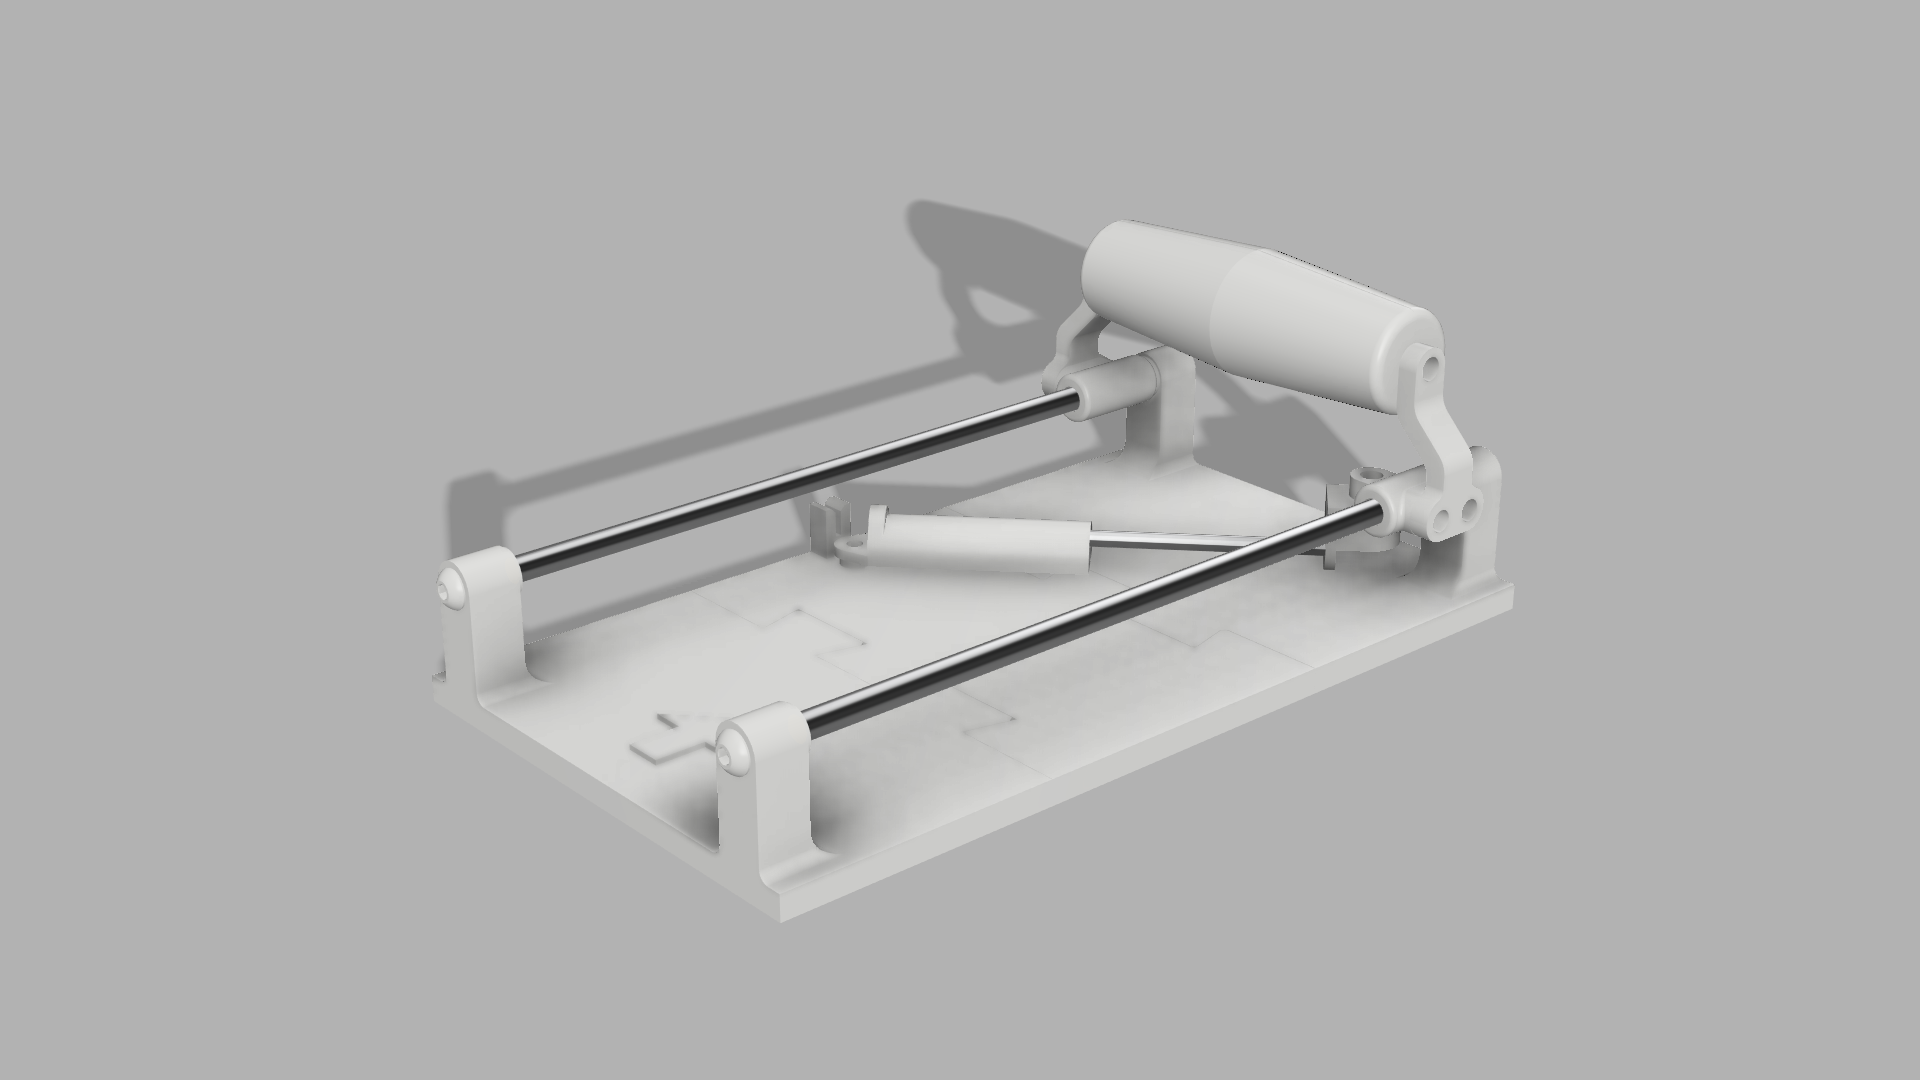
After this I made a linear prototype, the other common design I see. I got some cheap hollow brushed aluminum rods and set them up as the rails for the slider. Since they were so hollow and thin, they bent while attaching them and it didn’t move quite as smoothly as it could have, a pretty direct result of my skimpiness. The biggest issue I came across for this model was how to actually sense the movement. I pondered several mechanisms: linkages to rotate one bar proportionally to the other, gears rotating across a rack as it went, and anything else that could help translate linear motion to rotary motion. After doing more research, a belt system would have worked great (securing the belt to the handle so it rotates a pulley at the end). In hindsight the prototype I ended up actually building was more acceptable than I gave myself credit for, pretty similar to this one I found while doing some more research later on. In the end, I deemed it promising but moved on for now.
Rail Throttle
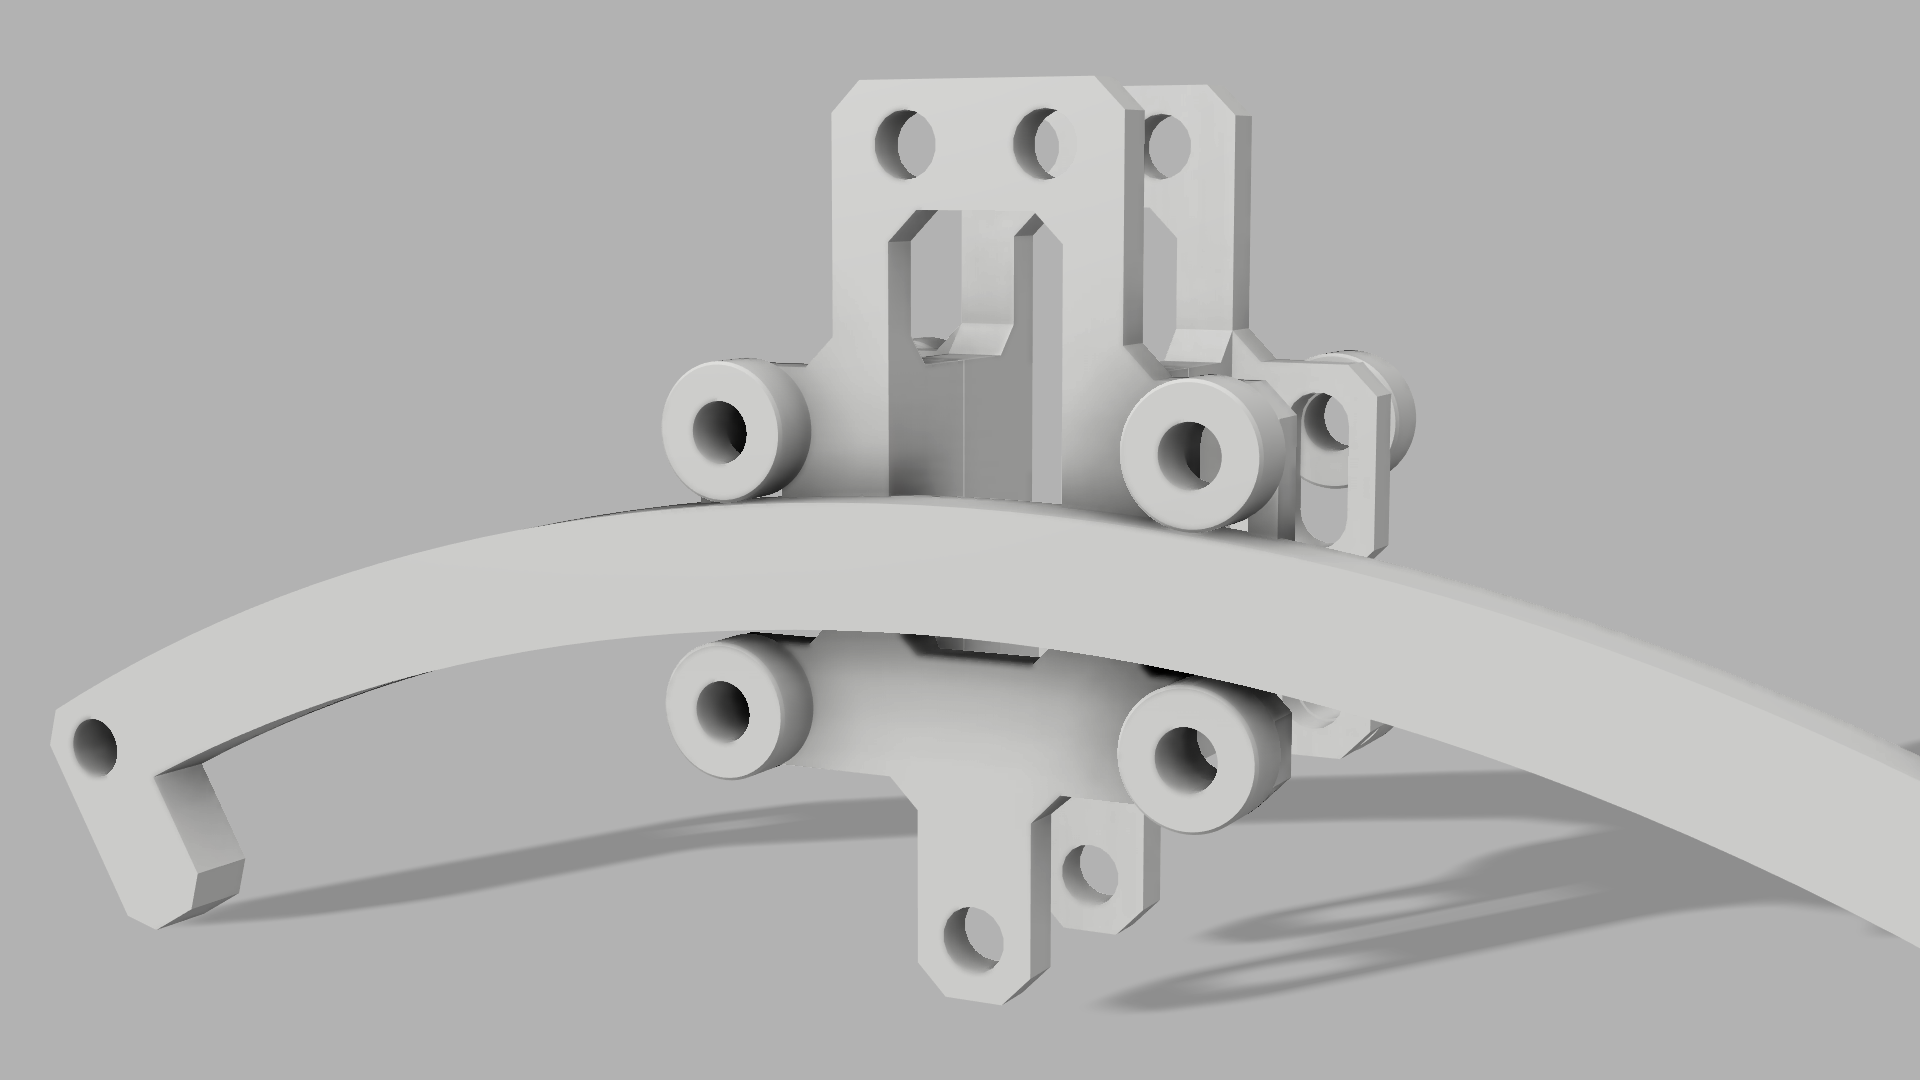
Finally the model that had been enticing me the most, the “railed” prototype. I figured if I had two axles spring-loaded together, one in a slot that could move, I could get it to grip to any shape rail. This mechanism ended up working wonderfully and indeed worked with a variety of curves (opening a cool possibility for a parametrically angled throttle), but again the issue became how to read the angle. More interesting ideas came out: could I use some conductive tape or something to make a resistor along the rail? The same gear system but having the rails as a rack? The same pin and slot system from the linear one? Unfortunately, I never quite answered that question as I lost interest and then got too involved in house moving to focus on projects.
The Push for Alpha v0.1
All of that tinkering is cool and I can brag about the “cool things I learned this weekend”, but if someone asked me what I actually got out of it, you may have noticed it’s, well… nothing. This is generally the same trend I’ve had for most of my life: I start a project, pick up the interesting technical challenges I didn’t know, figure them out, and then inevitably drop the project for the next shiny. Now that we’ve finally gotten our house to some semblance of sanity, I’ve started picking up my space sim games again, finally giving me that necessity to drive and finish at least something. I’ve also realized just how valuable my time is, so I really do have to make sure all of my tinkering is at least towards something useful.
I knew to have any chance of finishing this, I’d have to cut out as much as I could, another Zack Freedman tip. I chose the angular throttle to start with because it’s by far the simplest to hack together with the least chance of something going wrong. As much as I also desperately wanted to add some friction or a bump to indicate where zero was, I knew that was more complex than I was ready for so I just let it sit in the bearings. Ah well, this and other ideas were room for expansion, after I got something working.
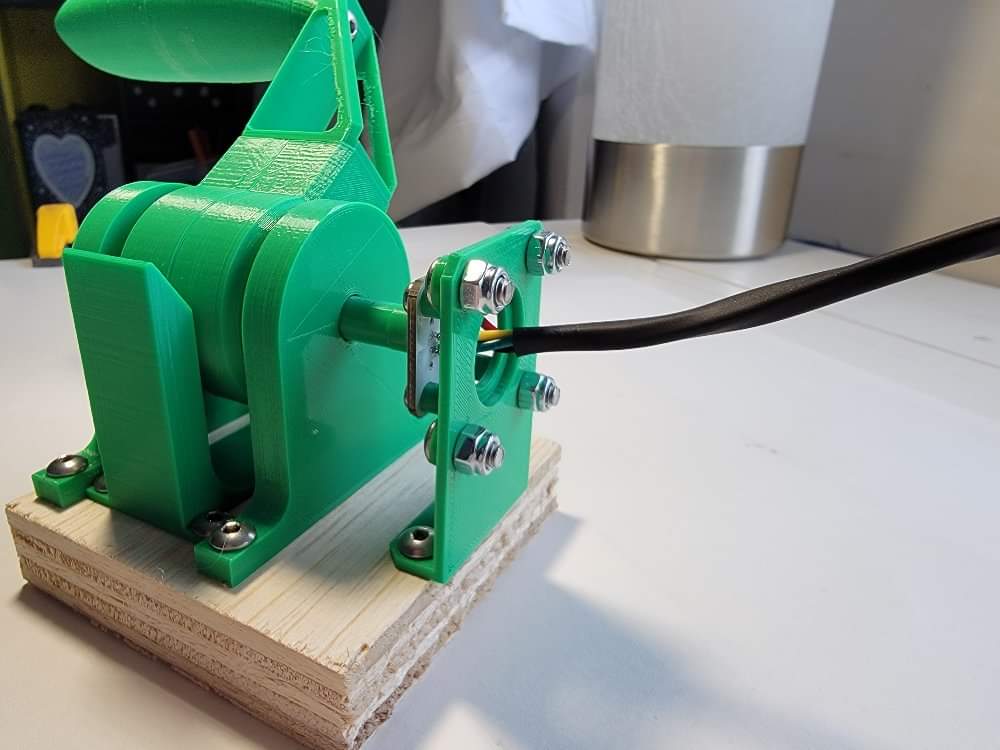
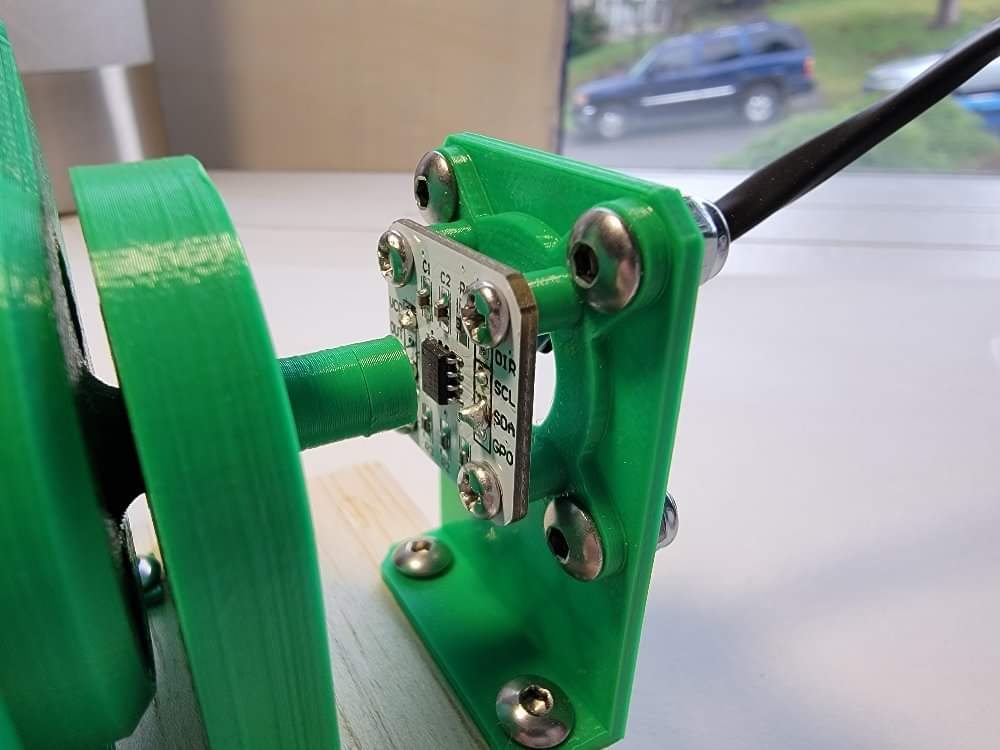
I spent a while in Fusion 360 drawing up parts, mainly designing with printability and modularity in mind. Both of these saved my butt big time: designing for printing from the start meant it came together in lighting speed, and the modularity means that I’ll have to design less parts next time around. The modularity also saved me at least one reprint when I was able to flip a misspaced mount around, bringing the magnet a few millimeters closer to the sensor to enable a reading. All is fair in prototypes and hacks, as long as you’re the only one depending on it of course!
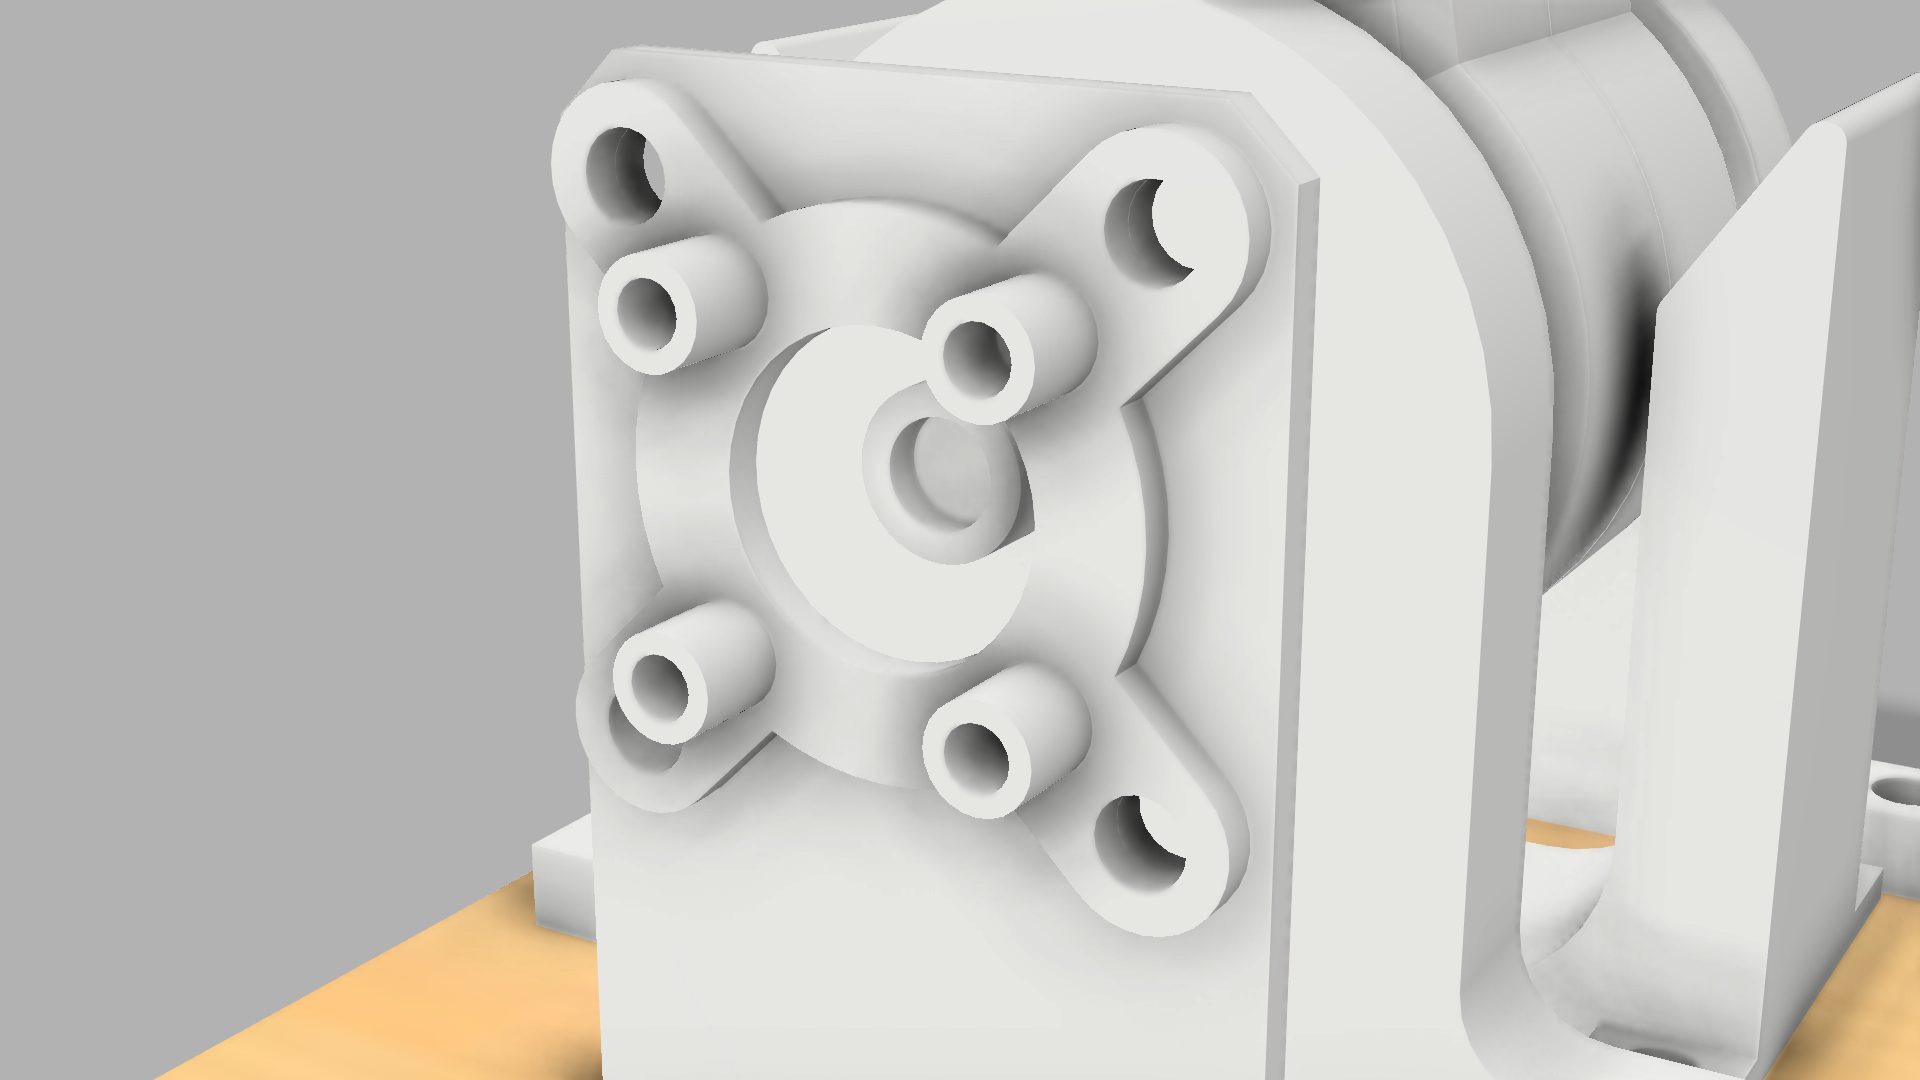
This mounting plate for the Hall Effect sensor will allow me to reuse it much more easily in future iterations, and can be mounted with the board facing either direction. It also saved me a reprint!
I was also once again reminded of the pros and cons of adhesives in making. I had the idea of taking the central shaft of the throttle and splitting it down the middle, so I could print two flat faces on the print bed and then merge them together with glue. This was fantastic… until I broke the shaft off one end and realized I now had to reprint both sides because they’re glued together now. I redesigned it with bolts and didn’t use glue from then on in the prototype. I may use it again in the final product for a more seamless design, but for me the potential to waste time is just too great.
As far as “finished prototypes” I’ve tried to build, this went much more seamlessly than normal, I’m almost certain due to the reduced scope and aggressive design tactics I used to get myself to just finish the dang thing. That just left a little wiring and then the software, my expertise. Wiring the sensor was easy (just four wires!) and taking a reading worked instantly. Converting that to a USB output also worked with a little more fiddling. Nothing fancy here, just a series of linear equations converting between input and output ranges and then the standard Arduino Micro USB libraries.
Software Gremlins, Good and Bad
The throttle registered in Windows with almost no fuss thanks to the wonders of the Arduino Micro, but did it work in Star Citizen? Not quite. For some reason no matter what I did it adamantly refused to be bound to a control. I tried changing the binding using the game itself, by modifying config files, and even tweaks like changing the device order and resetting my game settings, but nothing worked. After a bunch of poking though, I discovered that a lot of flight sim enthusiasts use Thrustmaster’s “T.A.R.G.E.T.” program or similar which basically simulates a virtual joystick. If it’s good enough for them, it’s good enough for me, and since programs like that make an entirely separate joystick it seemed promising that it would be recognized better than my hacky home project.
Sure enough, after running my input through a lovely little program called “Joystick Gremlin” the inputs registered like a charm. Even better, using desktop software for this means that I can tweak deadzones and invert inputs on the computer and probably even switch modes without having to reupload software every time. With that, the software was done for now and I had a full pipeline from moving the throttle in the world to seeing input in the game.
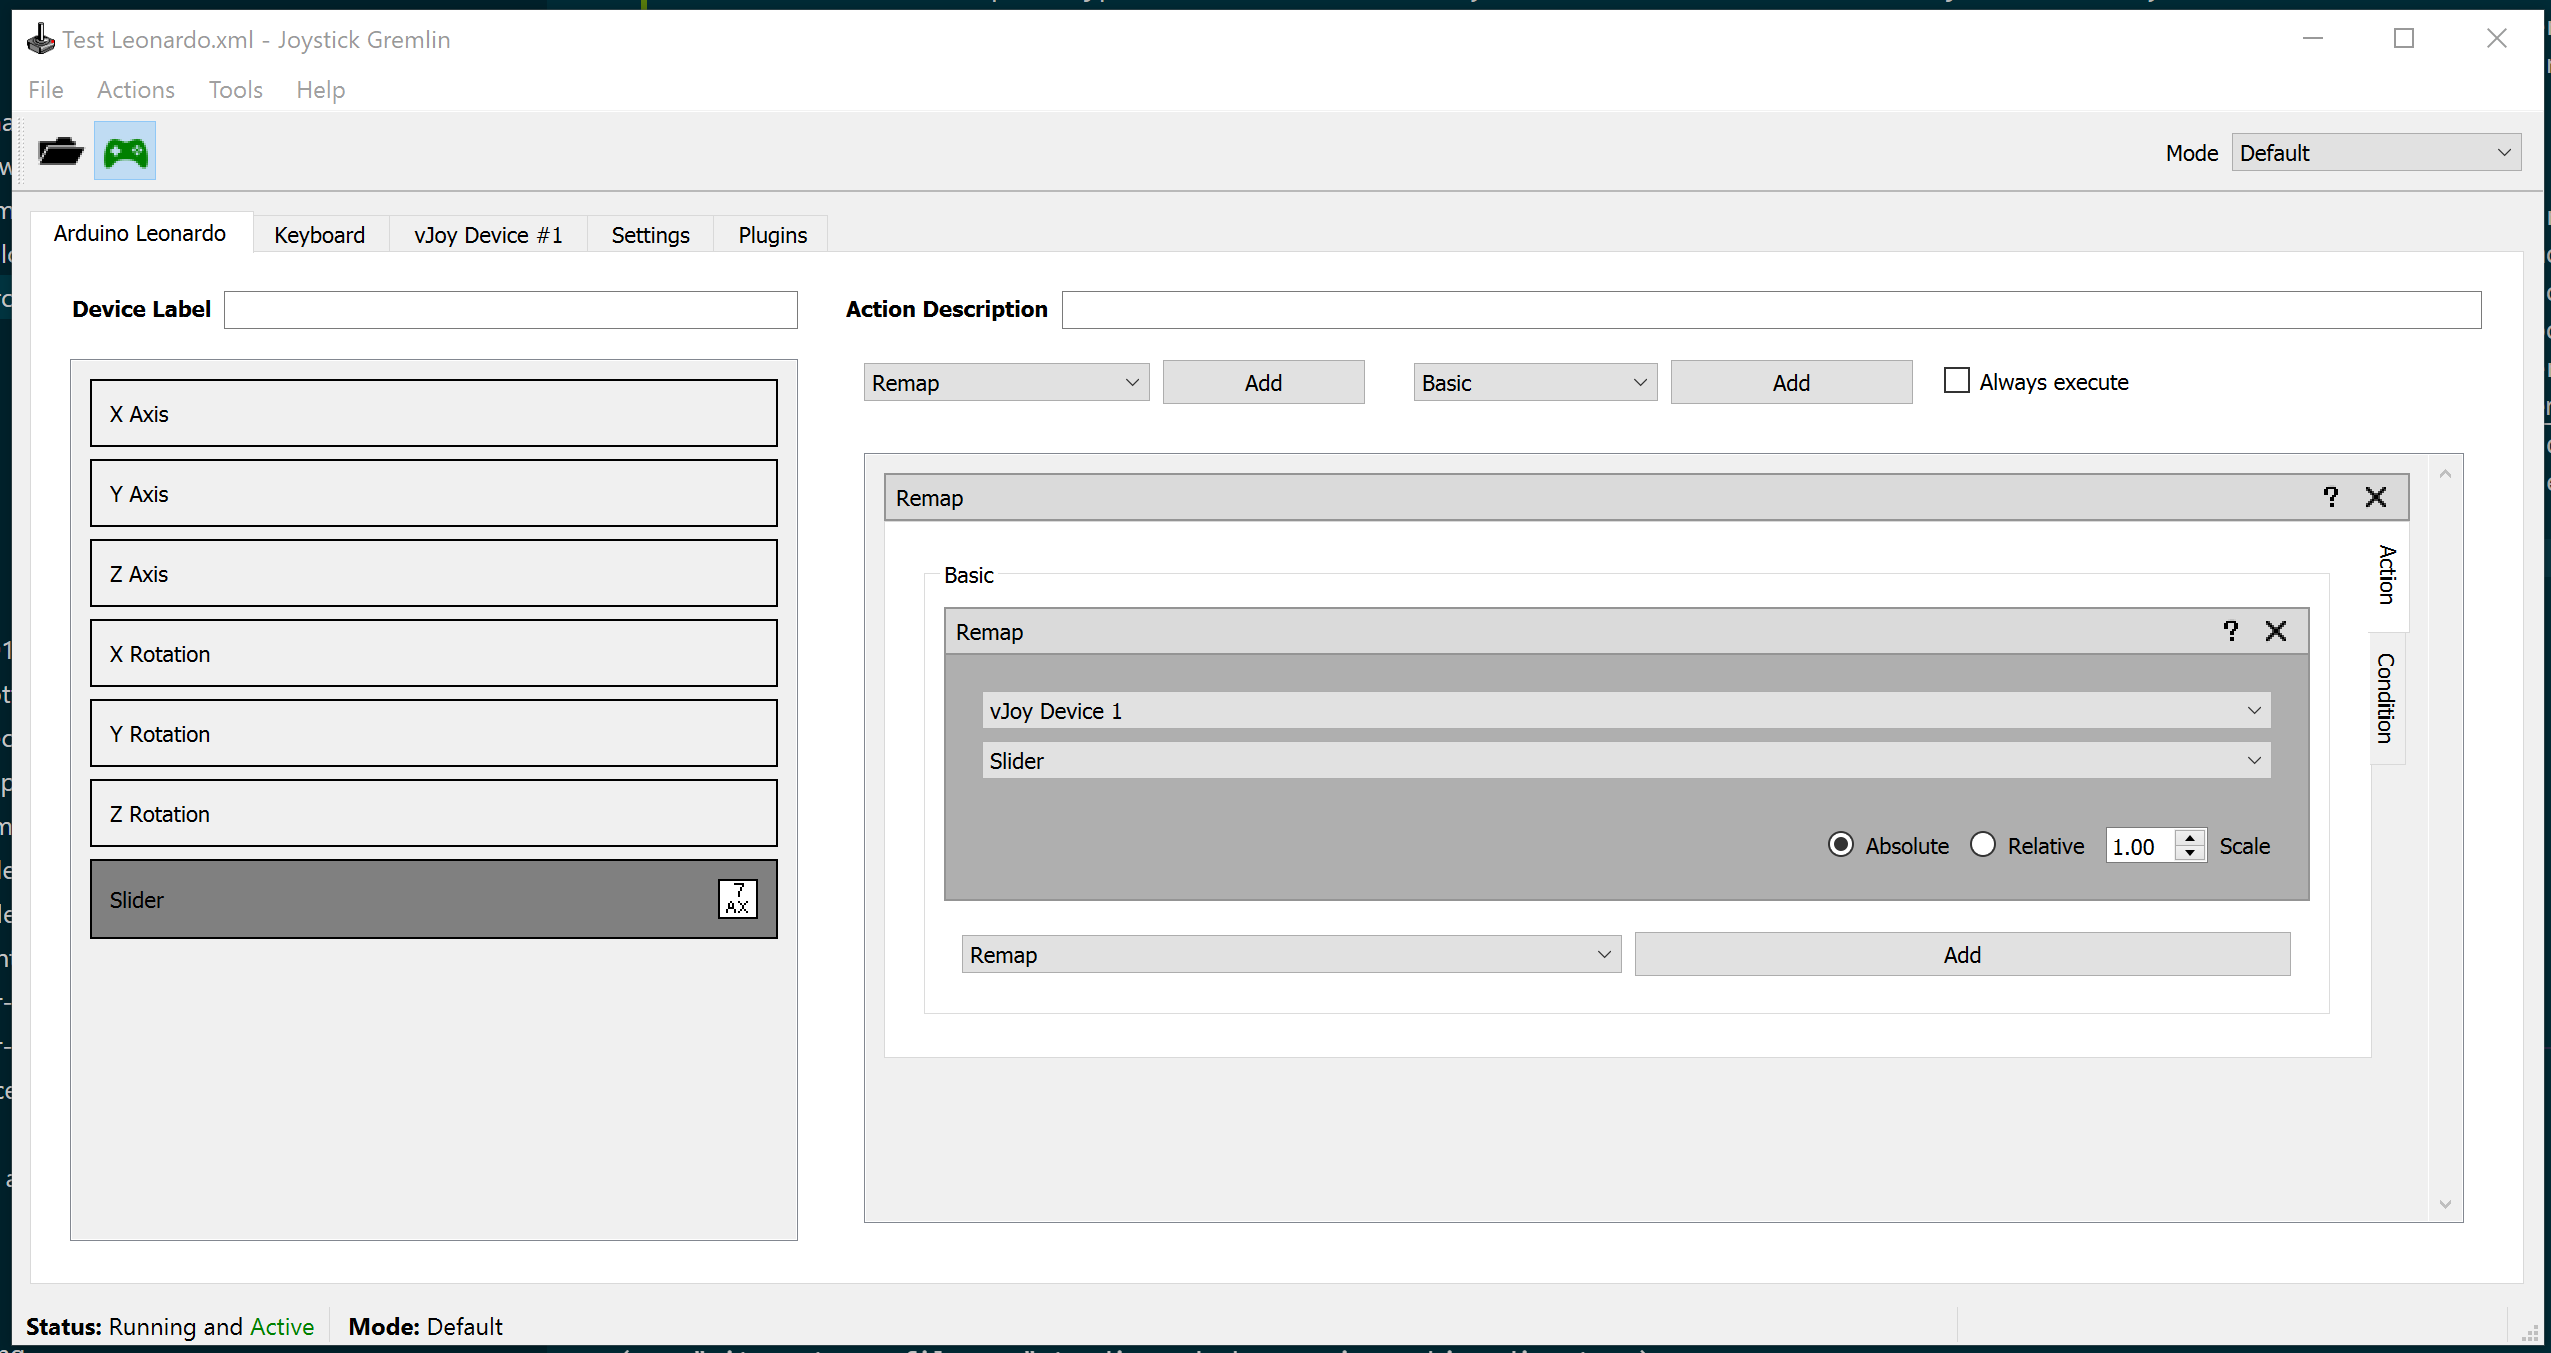
My stupid simple Joystick Gremlin setup mapping my throttle input to the virtual joystick output
So how’d I do?
The Result
Overall, what I’ve been calling “Alpha v0.1” is… well, it works, and that by itself is saying something for me. It provides me a means of giving smooth throttle input in an at least usable manner, and that is a net gain of something I wasn’t able to do before. Using it is a joy, for me at least, because even though it may flop around when I let go and the handle comes unscrewed sometimes it’s still miles ahead of driving with W and S for throttle. Simply put, any analog input is better than digital in most cases.
There’s definitely room for improvement: I for sure need a zero bump of some sort to stop it at the center, and the handle should be mounted either with a pivot or some mechanism to always keep it horizontal. The next most glaring missing feature is another axis, so that I can use the throttle and fully keep my hands off the keyboard. Currently I’m eyeing either strategically-placed buttons (which will give me the same resolution as a keyboard, all or nothing), a PoV hat (also all or nothing but more options) or some sort of “pedal” (like yaw pedals, but for fingers) which could be either digital or analog, which I’ve seen on some throttles.
Other than that, I’m definitely excited to turn up the visual flair now that I know I’m at least capable enough to build a basic version. LED strips for an indicator would look much nicer than the three hacky LEDs I have. I’m also hoping to make a much better case with a removable outer shell so the electronics have a permanent base, and can also have buttons and even a small LCD display set up underneath it.
I’ve been getting very good use out of the throttle while drafting this post and thinking about other ideas, and I’m definitely excited to work on the next iteration. If you’re interested in knowing more about any of the prototypes or ideas mentioned here, or just have questions, comments, or ideas, please feel free to reach out. Thanks for reading!